![]() Allocating samples to groups
Allocating samples to groups
|
|
Top Previous Next |
|
Use the Grouping tab to create groups and assign individual samples to groups:
Allocating samples to groups is easily done by either of two methods; A., selecting a sample or block of samples and dragging to another column in the grid, or B., selecting the required samples, and right-clicking to send them to the required group.
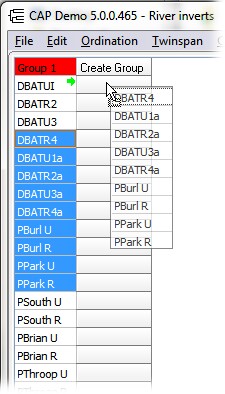
A. Grouping by dragging/dropping Initially all the samples are in the unassigned column. Click and drag to select one or more samples from Column 1. The selected samples will appear blue. Then simply drag the block of samples to the 'Create Group' column:
You will see a green arrow appear to show you the column the samples will appear in. Release the mouse button to drop the samples into that column; a dialog box will appear to assign a name to the new group. If you do not enter a name a default name will be created by CAP. Further samples can then be dragged from the 1st column into Group 2, or into the 'Create Group' column to create another new group:
Repeat this process as often as you wish to create further groups; you can also drag and drop samples between groups.
B. Grouping by right-clicking Alternatively, you can move samples to a new group, or between existing groups, by clicking and dragging to select the required samples (as above), then right-clicking, and selecting the group to add the samples to, from the pop-up menu:
Once you have created your groups, you can edit the group names and the colours associated with the groups. To help you sort your samples and understand which groups are most appropriate for them, you will find in the bottom panel a number of sorting options.
NOTE: If a data set has a column with 0 observations in it, that column is always going to be removed on loading the data set, when the data are transferred to the Working Data tab. Even if the raw set is reloaded, the 0 column is again removed. The deselected column is always therefore going to be shown on the Grouping tab, in red italic text.
|